Setting Up Visual Studio Code Based IDE Development Environment (Windows)
This article describes how developers can set up a Visual Studio Code based IDE development environment on Windows 10 or Windows 11 operating systems.
Visual Studio Code can serve as a convenient tool for code viewing, development, and debugging. However, to ensure operational standardization and consistency with the actual runtime environment, it is recommended that users use PuTTY or other SSH client tools for common command-line access and execute daily operations such as make.
It is not recommended to use the built-in compilation logic of Visual Studio Code and the system's auto-compilation for projects. Using the auto-compilation features of an Integrated Development Environment (IDE), including its integrated testing tools, depends on the internal configuration of the IDE tools. This configuration may differ from the target configuration and environment for product releases, so it cannot fully simulate the user's actual runtime environment.
Concept Introduction
- SSH Client: An SSH client is a software tool used to connect to and manage remote servers, allowing users to communicate with remote servers through encrypted connections.
- Cygwin: A Windows-based Linux environment emulator that provides an environment for running Linux applications and tools on Windows systems. Cygwin can simulate Linux file systems, command lines, and tools, enabling users to run Linux applications and tools on Windows.
- User Profile: A user profile is a personal configuration file that contains user environment variables, startup scripts, and other information. When a user logs into the system, the system reads the user's profile file to load the user's configuration. In Windows systems, user profile files are typically located in the
.bash_profilefile in the user directory. - PuTTY: A Windows-based SSH client tool that provides an environment for running SSH applications on Windows systems. PuTTY can simulate Linux file systems, command lines, and tools, enabling users to run Linux applications and tools on Windows.
- Visual Studio Code Extension: VS Code extensions are extensions that add extra functionality to the VS Code editor. Extensions can add syntax highlighting, code autocompletion, code navigation, code formatting, and other features to VS Code. Installing and using VS Code extensions is very simple - users just need to search for and install extensions within the VS Code editor.
Configuration Steps
Configuring SSH Client on Windows System
To ensure SSH connection stability and compatibility, the SSH client bundled with Windows is not recommended, especially on Windows 10 systems. It is recommended to install and use the SSH client from Cygwin.
If the Cygwin installation process is relatively complex, you can also use some Windows applications based on Cygwin distributions that come with an SSH client, such as: PortableGit-2.44.0-64-bit.7z.exe
Installing SSH Client
The recommended installation package is in compressed form and can be directly extracted to a specified directory. It is recommended to install it in a directory containing only English characters, numbers, and underscores, such as:
D:\soft_install\tools\PortableGit
Generating Keys on Windows
Start a Windows command line (cmd.exe)
cd D:\soft_install\tools\PortableGit\usr\bin
ssh-keygen -t rsa
Then complete the operation according to the default settings. The system will generate a pair of private key and public key files on Windows, stored by default in the .ssh directory of the user directory (%USERPROFILE%/.ssh), for example:
C:\Users\douzhitong\.ssh\id_rsa
C:\Users\douzhitong\.ssh\id_rsa.pub
Preparing Linux Development Machine User ID
Before proceeding with subsequent operations, please ensure you have obtained and prepared your user ID on the Linux development machine. This user ID is created by the system administrator, and developers will receive the corresponding user ID and password. This rule also applies to users in virtual machines or Docker.
This document applies to scenarios where each developer uses a different user ID on the Linux server.
Users in Linux systems are created by system administrators. Developers will receive the corresponding user ID and password. This rule also applies to users in virtual machine or Docker environments.
User Profile Configuration
Typically, the user's SHELL is bash, and the required environment variables can be configured in the .bash_profile file in the $HOME directory of the development user.
SSH Configuration
mkdir -p $HOME/.ssh
touch $HOME/.ssh/authorized_keys
Next, copy the content from the id_rsa.pub file generated in Generating Keys to the authorized_keys file above. After completing this step, verify whether passwordless login to the Linux server works from Windows:
D:\soft_install\tools\PortableGit\usr\bin\ssh.exe -i C:\Users\douzhitong\.ssh\id_rsa -l dev2 -p 2233 10.110.10.168
In this command:
- The parameter after
-iis the absolute path to the private key file on Windows, for exampleC:\Users\douzhitong\.ssh\id_rsa - The parameter after
-lis the username to log into the Linux server, for exampledev2 - The parameter after
-pis the SSH port to log into the server, for example2233
If this command does not achieve passwordless login, please check if there are any issues with the above steps. Common problems include improper permissions on the .ssh directory or its files in Linux. After resolving the issue, continue with the following steps.
KWDB Development Environment Setup
This mainly involves system environment setup and development environment ID variable configuration. Refer to the Compilation Documentation. Regular users do not have root permissions. Contact the system administrator for system-level operations.
Configuring Visual Studio Code in Windows
Installing Visual Studio Code
It is recommended to use the installation version rather than the extracted version, and keep Visual Studio Code continuously updated (it is recommended to use a version within 6 months).
The server-side components of Visual Studio Code in Linux, including extensions, need to be downloaded from the network, and the download URLs are hardcoded into the Visual Studio Code binary. URLs referenced by older versions of Visual Studio Code may become invalid, causing issues with the Linux vscode-server being unable to download and use.
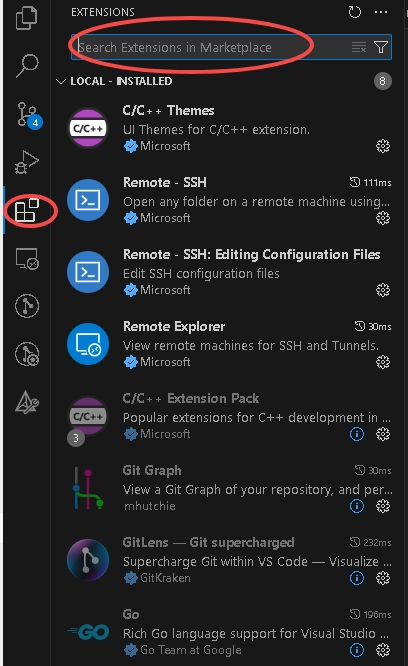
Installing Visual Studio Code Extensions
Click the "Extensions" button on the left, search for the extension name in the top bar, and install all the following extensions:
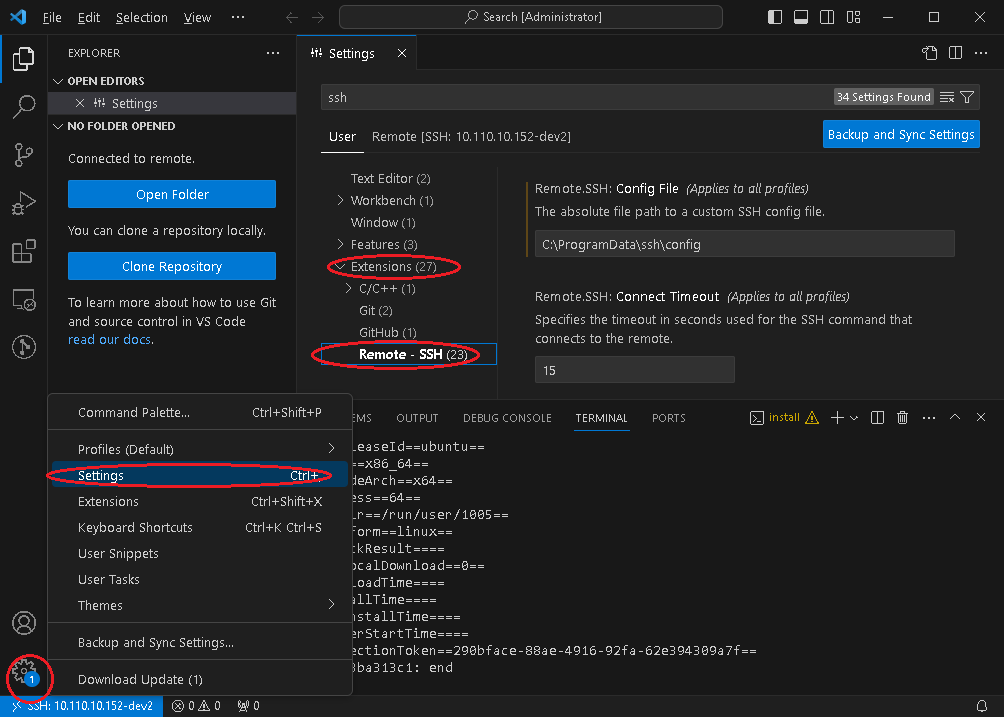
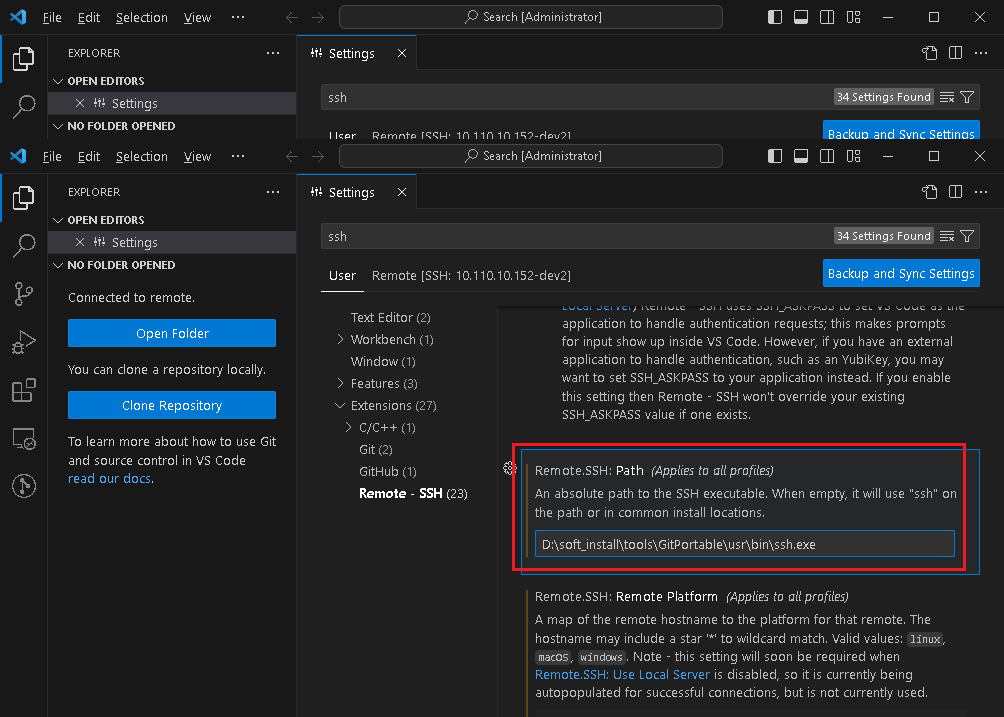
Essential SSH Configuration in Visual Studio Code
Enter SSH configuration from the settings (as shown in Figure 1), and configure your SSH client in Visual Studio Code following the second image below. For other SSH configuration items, do not modify them without relevant knowledge, as incorrect configuration may cause issues.
Configuring SSH Connection in Visual Studio Code
-
Add SSH connection information in Visual Studio Code
After the extension is installed and SSH command is configured, click the button in the lower-left corner as shown below, and select
connect current window to hostfrom the popup command: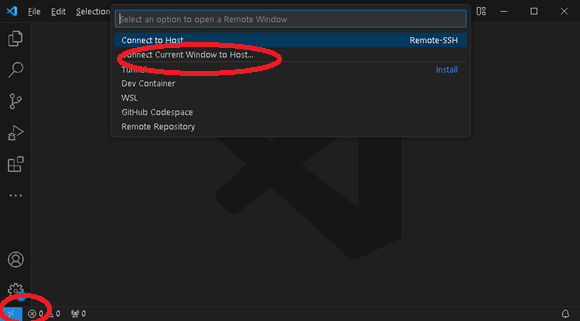
-
In the popup window, select
Configure SSH Hosts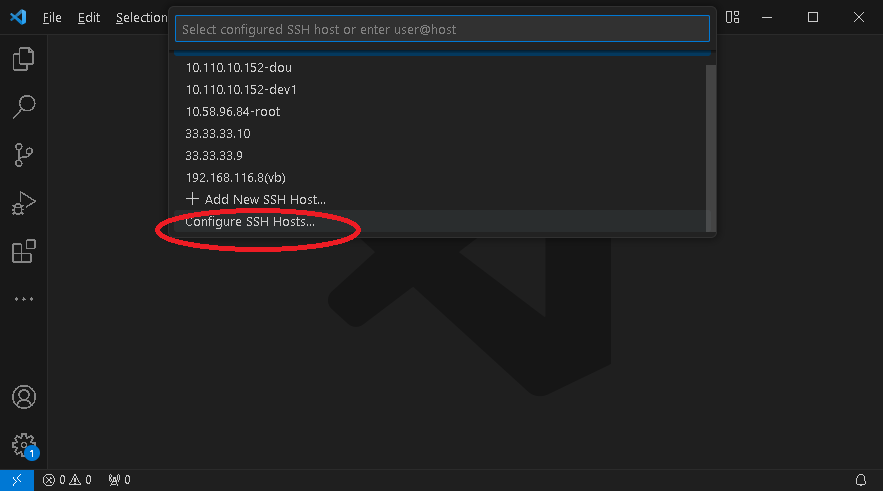
-
Select the configuration file
Visual Studio Code often prompts 2 configuration files - one in the current user's directory and another in the
%USERPROFILE%/.sshdirectory. It is recommended to use the file in the%USERPROFILE%/.sshdirectory. If the file does not exist, manually create a file during the first configuration. Otherwise, selecting the file may have no effect.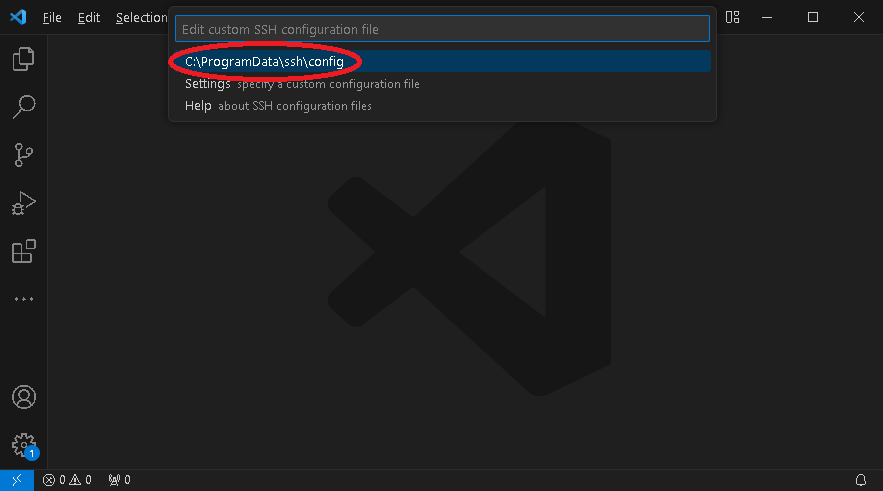
-
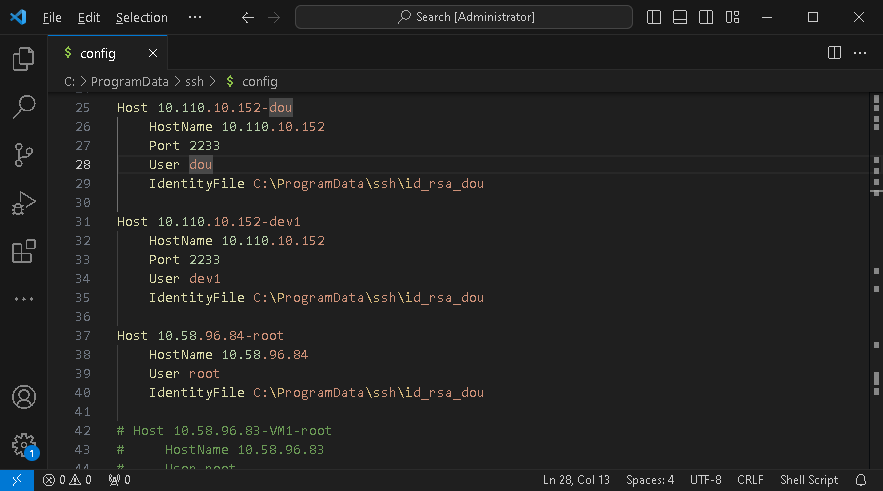
Add the remote connection information you want to configure
The content format is as shown below:
For the verification command in SSH Configuration:
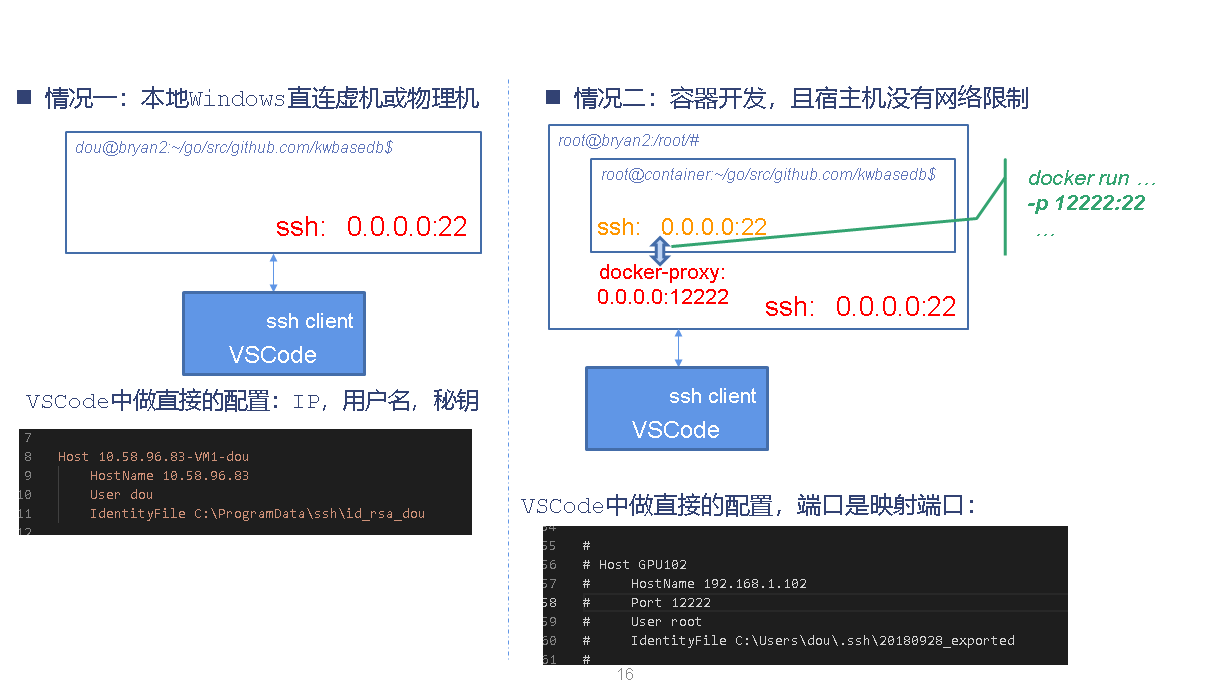
D:\soft_install\tools\PortableGit\usr\bin\ssh.exe -i C:\Users\douzhitong\.ssh\id_rsa -p 2233 -l dev2 10.110.10.168Based on the above SSH command, the corresponding configuration content format is as follows (the Host field can be customized, other fields must be filled strictly according to actual parameters):
Host 10.110.10.168(dev2)HostName 10.110.10.168Port 2233User dev2IdentityFile C:\Users\douzhitong\.ssh\id_rsaAfter completing the configuration, please save the file.
Verifying and Initializing SSH Connection
Initiate the connection again and select the connection you just established, similar to the following image:
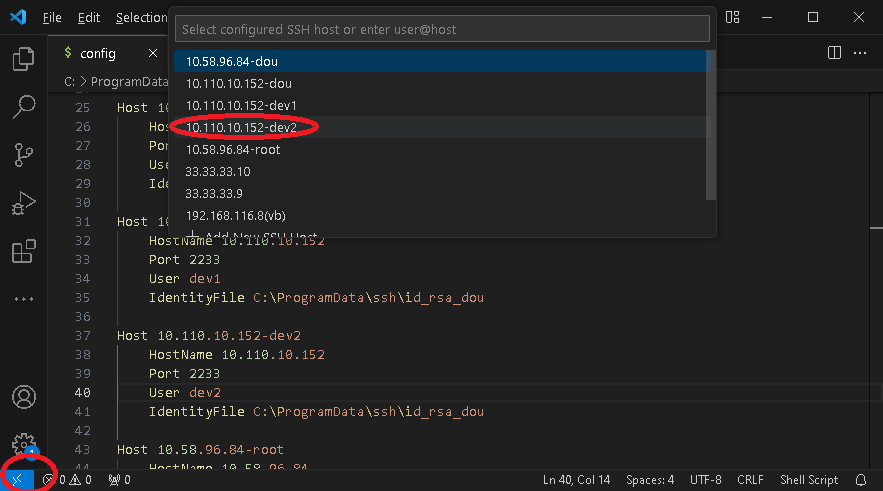
As shown in the image: A prompt appears in the lower-right corner when all Visual Studio Code to server connections are established.
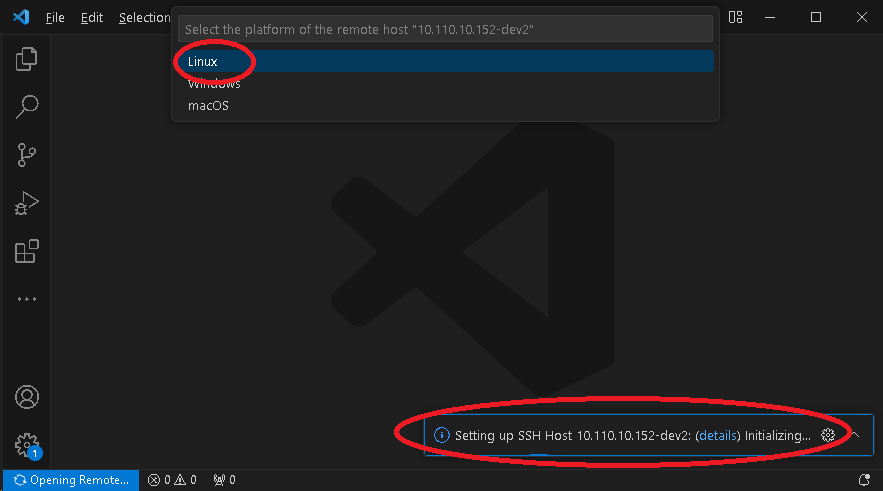
During the first connection, Visual Studio Code will prompt for the server type. Since we are using Linux, select Linux:
Selecting Linux will cause Visual Studio Code to download the server-side software under your account in the Linux system. The prompt information during this process is shown in the image below.
Due to the impact of network download speed, this process may take a long time (approximately 30 minutes), please be patient. Sometimes the download may be interrupted, and the prompt interface will remain stuck. In this case, close the Visual Studio Code window, try reconnecting after restarting. This download behavior will resume from the breakpoint.
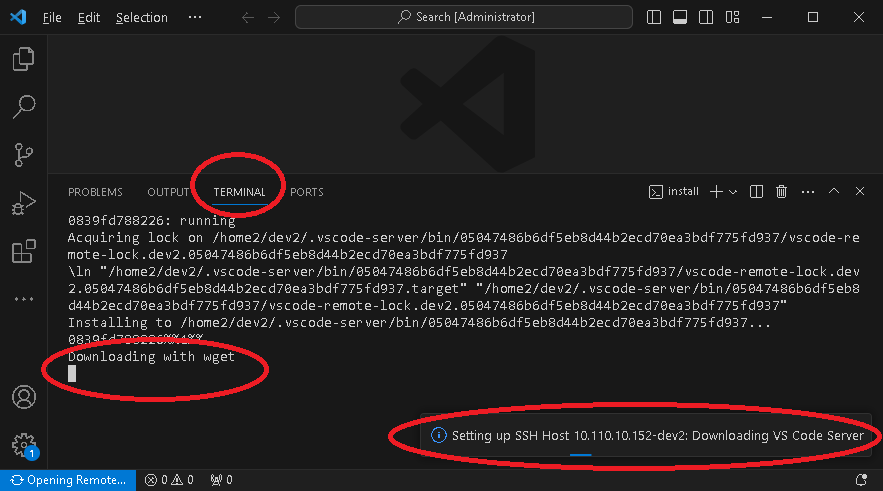
If you are concerned about configuration or download abnormalities under your Linux account, perform the following operation in your user directory to verify that files are being downloaded:

If you suspect there are network connectivity issues, try running ps -ef |grep wget in the Linux system to get the original command line, then manually test whether there are connectivity issues to Visual Studio Code's web server.
VSCode Server and the Visual Studio Code client version used for development are mutually locked. If you use Visual Studio Code V1.70 on machine A and V1.80 on machine B, when these two machines first connect to the same Linux development ID, they will both need to download VSCode Server (different versions) which takes a long time.
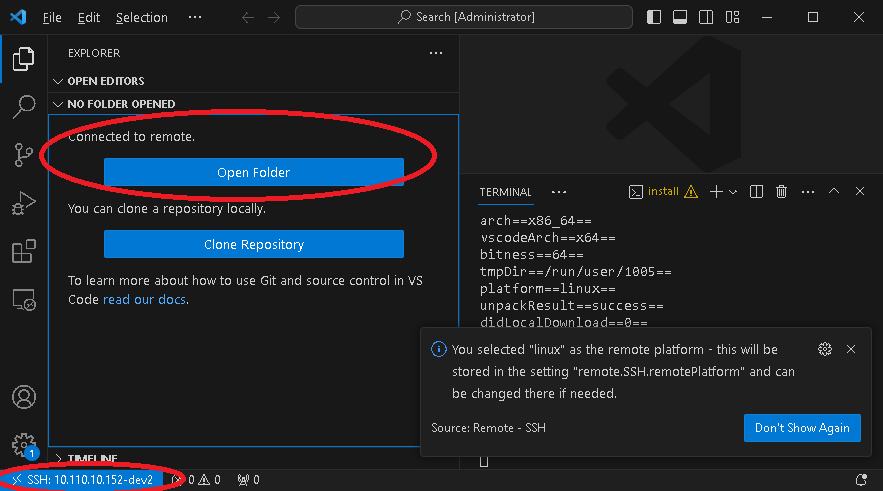
After completing this step, the system will enter the ready state and prompt that you can open a directory.
Installing Visual Studio Code Extensions in Linux Connection
-
Install local Visual Studio Code extensions to the Linux server
As shown in the image below, click all options marked with ellipses in sequence. This installation process takes a long time. After installation is complete, the server-side extension functionality is also installed in the
$HOME/.vscode-serverdirectory. If extensions fail to install, it will affect code navigation experience and debugging, but other editing and development work will not be affected.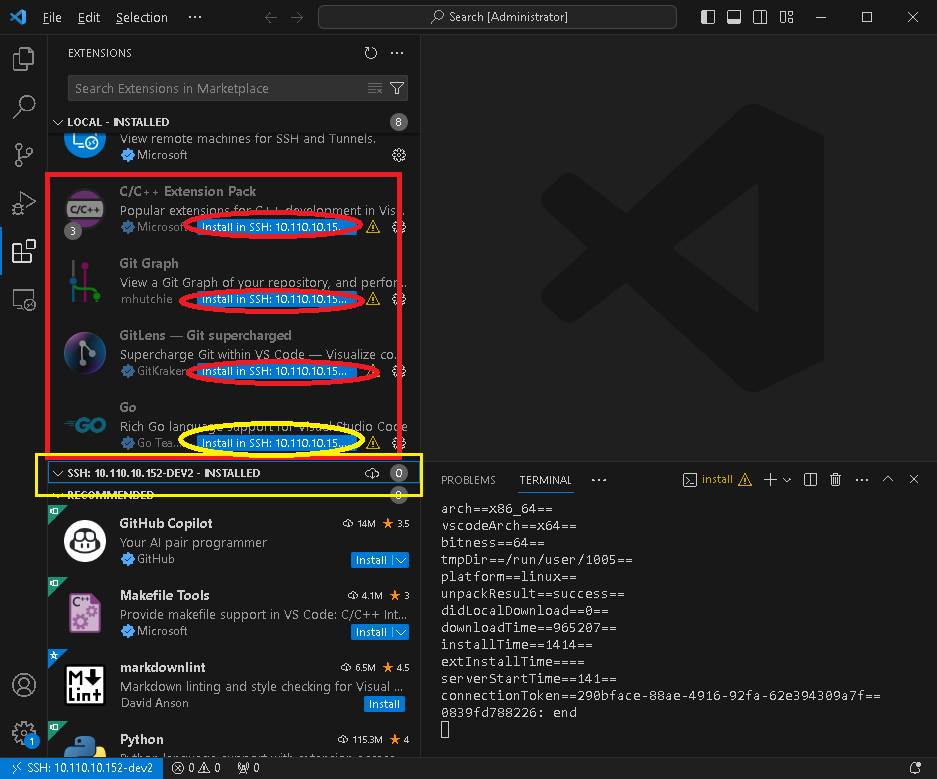
During installation, extensions will show an
installingprompt, with a dynamic progress bar at the top. This process takes a long time (may take 10-20 minutes), and download stagnation issues may occur. It is recommended to disconnect and retry. If you encounter network connection issues, wait for the network to recover before proceeding.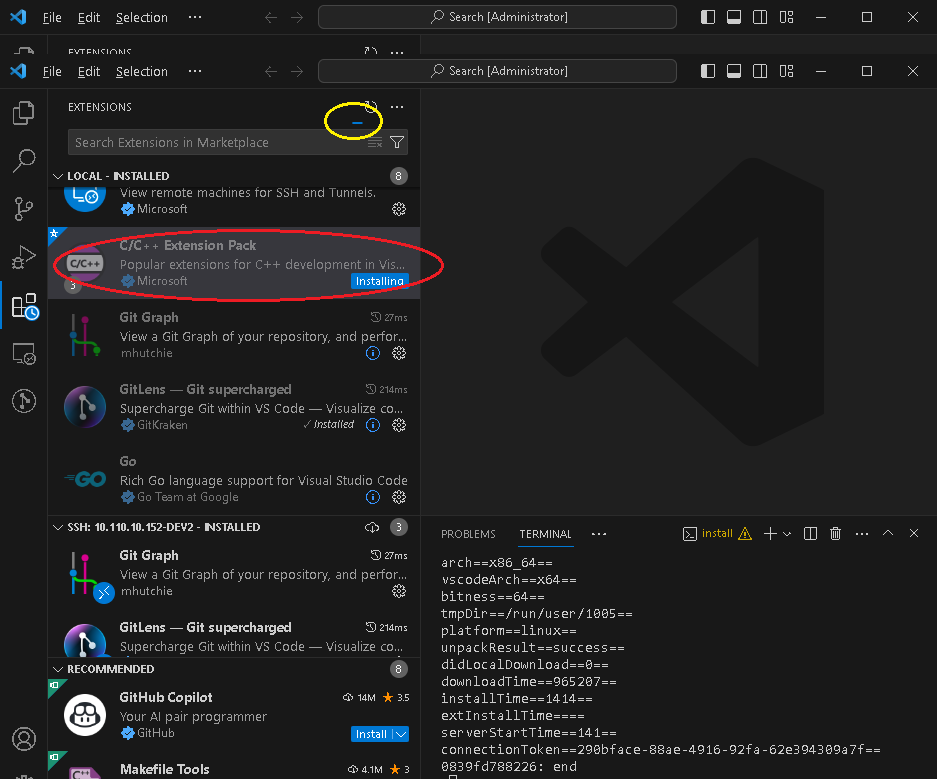
Installed extensions will have a prompt in the middle window:
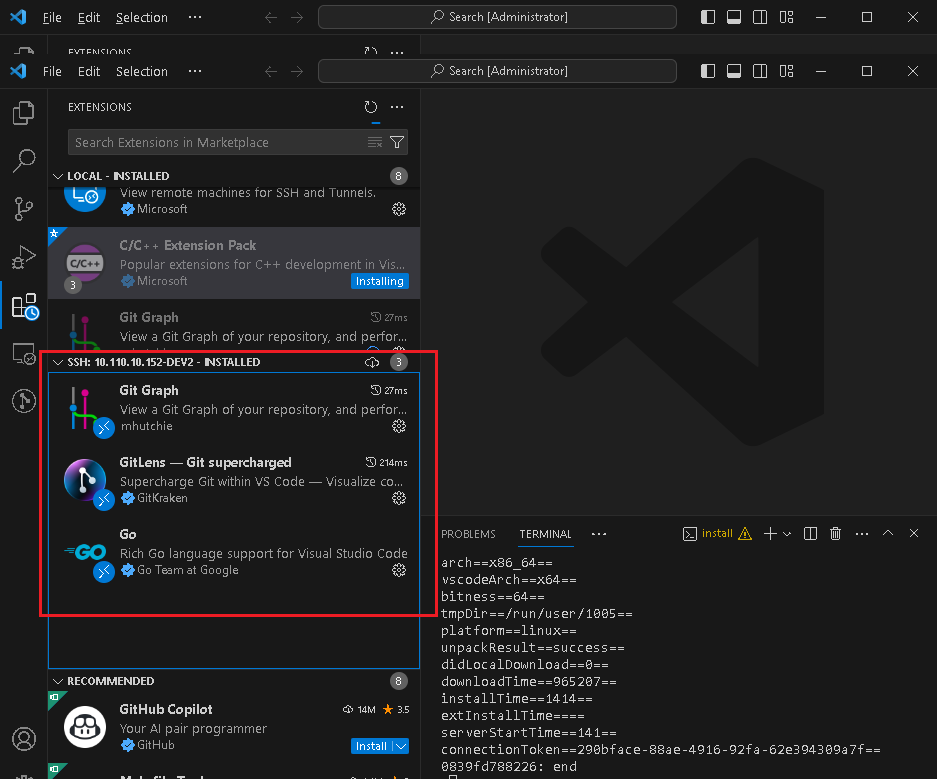
After completing this step, restart Visual Studio Code.
warningThe versions of various extensions are closely related to the Go version. By default, the extension version matching the current version is installed. If the Go version changes after installing extensions, you may encounter various issues due to version mismatches.
-
Install Go tools necessary for Visual Studio Code
Temporarily enable
GO111MODULEin the terminal of Visual Studio Code: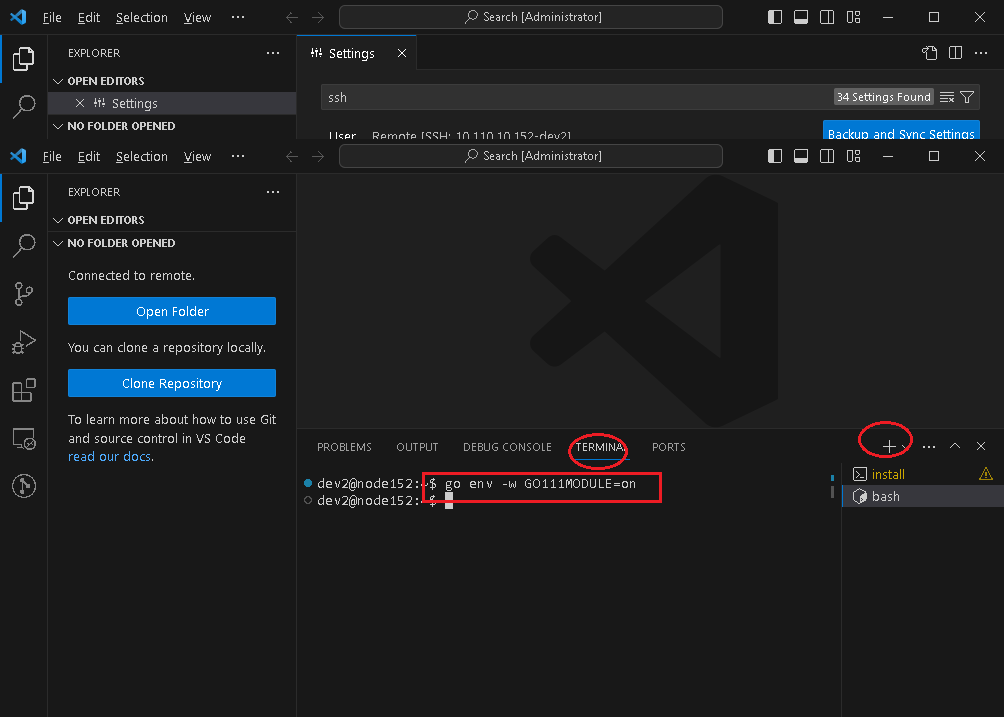
Domestic users need to run the following command to configure Go's proxy:
go env -w GOPROXY=https://goproxy.cn,directFirst, ensure that the Go version in your development environment is 1.16 or above (verify with
go version). When the version requirement is met, pressShift + Ctrl + Pin Visual Studio Code to enter the command line state, and select to install Go tools as shown in the image (GOPROXY needs to be configured in advance). Please note that this operation depends on the Go version detected by Visual Studio Code on the server side. Different Go versions may result in different versions of Go extensions being installed.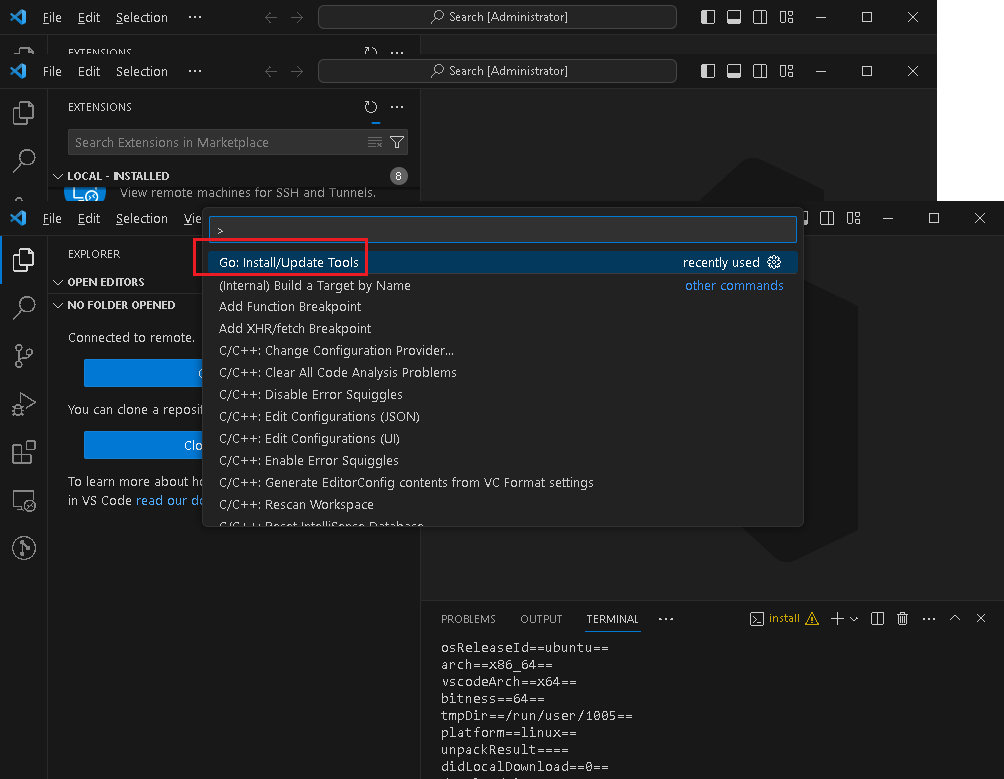
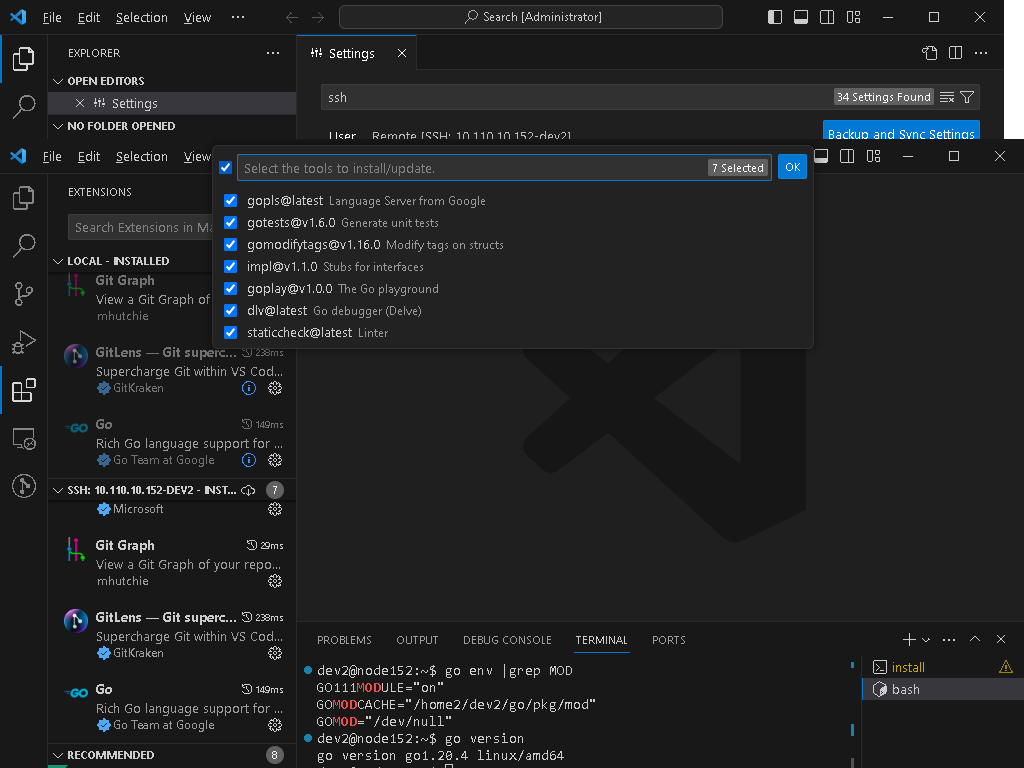
Select all components
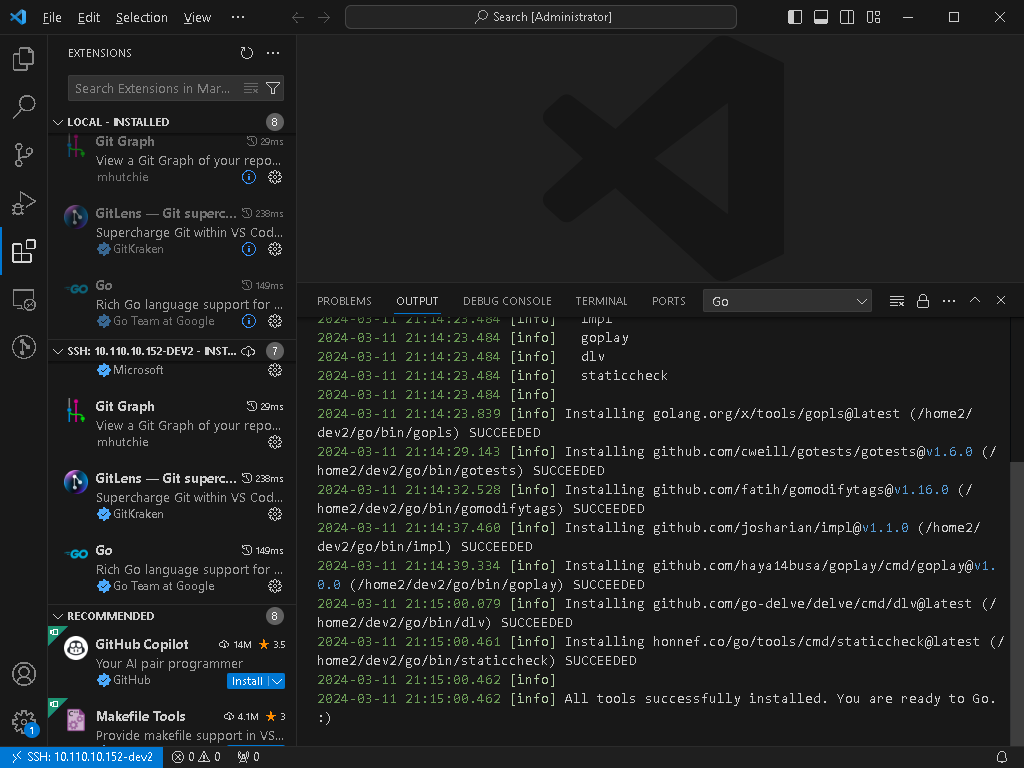
There will be a corresponding prompt after installation is complete:
After installation is complete, disable
GO111MODULEin the terminal of Visual Studio Code:go env -w GO111MODULE=off
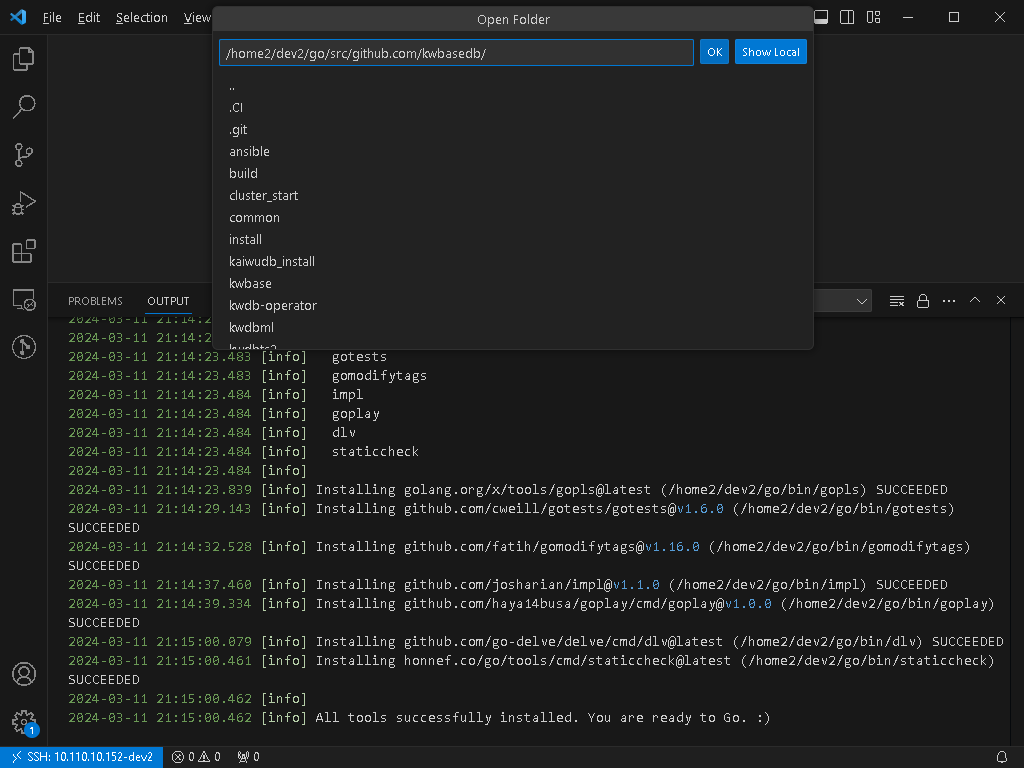
Opening Code Projects
Clone the code in advance and open it as prompted. Note that Visual Studio Code also drives Go to scan code in the background, so it is recommended to compile once in the code directory before opening it with Visual Studio Code, so that Visual Studio Code will show fewer errors or warnings.
Code Debugging
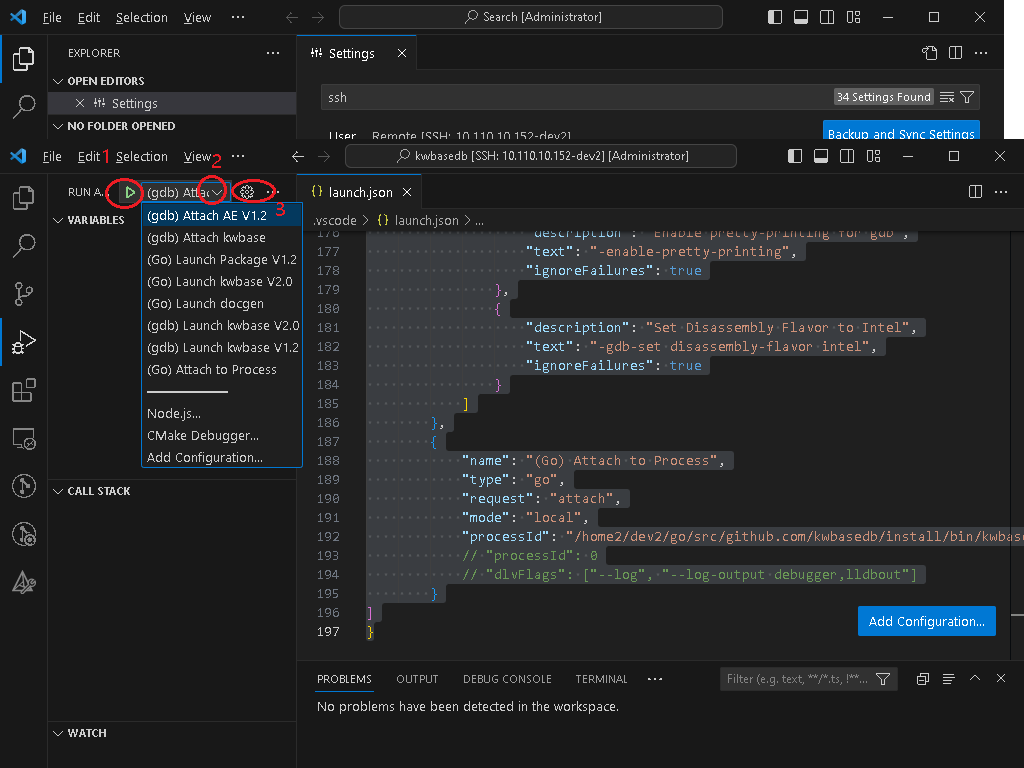
Visual Studio Code can have multiple debug profiles (debug configurations). Press F5 (the red circle 1 in the image) to start the default mode (the red circle 2 in the image).
Click the configuration button (the red circle 3 in the image) to open the configuration file (it needs to be created when opening for the first time). The configuration file is named launch.json, and its content can be configured by yourself. You can refer to the Appendix Examples for various debug configurations used in different scenarios.
Visual Studio Code Server-Side Configuration Migration
vscode-server
The configuration steps above assume using the Visual Studio Code client on Windows to remotely access an account on Linux (or any Linux virtual machine or container accessible via SSH). As mentioned above, when different Visual Studio Code versions access the same Linux account, the Linux side will download the matching version of vscode-server, as well as the extension versions.
For this Linux account, all VSCode Server version binaries and extension binaries that have been accessed via Visual Studio Code are stored in the $HOME/.vscode-server directory. If there are other Linux development environments with the same architecture and OS (preferably with the same username), you can package and copy the .vscode-server directory to the new environment. This way, the original VSCode client can directly access the new environment without reinstalling vscode-server and extensions.
Golang Extension Tools
Tools installed by the Go extension in Visual Studio Code are installed by default in the $GOPATH/bin directory. After default installation, they are all binary files. You can directly copy them to the corresponding directory in the new development environment, and they will work normally with the vscode-server copied in the previous section.
Debug Configuration and Other Project-Related Configurations
Configurations in Visual Studio Code projects/directories, including debug configurations, are stored in the ${workspaceRoot}/.vscode directory, with file names settings.json and launch.json. If the working code base is the same, these two files can be copied and used directly.
Known Issues
- During debugging, dlv may exit abnormally. Usually, retrying the operation will restore normal functionality. If the problem persists, please reinstall Go tools in Linux connection.
- Various extensions will also update automatically, and some abnormalities may occur during extension updates.
- Go code viewing and navigation depend on the gopls process in the Linux development environment (installed as part of Go Tools). This process typically occupies 3-5GB of memory. If system resources are insufficient, you can choose not to install this component, or disable the language server in the configuration. However, this will affect functions like
F12for viewing definitions. - The Go extension in Visual Studio Code requires the Go runtime version to be no lower than 1.16 (or higher), but our standard environment for running
make testand other tests in the development environment is Go 1.15.14. It is recommended to use a higher version of Go during development for debugging, and switch to version 1.15 for testing verification before pushing code.
Common Operations
Visual Studio Code Operations Differ from GoLand
Ctrl + P - Search for files in the project by filename
Ctrl + Shift + F - Full-text search for function names and other keywords (in the search box on the left)
Ctrl + T - Use the Go extension to search for Go code symbols, such as function names
F12 - Jump to the definition of the current function or variable (supported by Go or C++ extensions. If the function is abnormal, please check the extension status)
Shift + F12 - View references for the currently selected symbol (may respond slowly)
Using Visual Studio Code to Proxy kwbase Service (--listen-addr or --http-addr Port to Local)

Simply enter the port that the server is listening on in the popup window:

The Visual Studio Code extension will automatically fill in the subsequent fields:

After that, you can access the specified port.
Appendix
launch.json Examples
{
    // Use IntelliSense to learn about possible attributes.
    // Hover to view descriptions of existing attributes.
    // For more information, visit: https://go.microsoft.com/fwlink/?linkid=830387
    "version": "0.2.0",
    "configurations": [
        {
            "name": "(gdb) Attach AE V1.2",
            "type": "cppdbg",
            "request": "attach",
            "program": "${workspaceRoot}/install/bin/kwdbts_server",
            "MIMode": "gdb",
            "setupCommands": [
                {
                    "description": "Enable pretty-printing for gdb",
                    "text": "-enable-pretty-printing",
                    "ignoreFailures": true
                },
                {
                    "description": "Set Disassembly Flavor to Intel",
                    "text": "-gdb-set disassembly-flavor intel",
                    "ignoreFailures": true
                }
            ]
        },
        {
            "name": "(gdb) Attach kwbase",
            "type": "cppdbg",
            "request": "attach",
            "program": "${workspaceRoot}/install/bin/kwbase",
            "MIMode": "gdb",
            "setupCommands": [
                {
                    "description": "Enable pretty-printing for gdb",
                    "text": "-enable-pretty-printing",
                    "ignoreFailures": true
                },
                {
                    "description": "Set Disassembly Flavor to Intel",
                    "text": "-gdb-set disassembly-flavor intel",
                    "ignoreFailures": true
                }
            ]
        },
        {
            "name": "(Go) Launch kwbase V2.0",
            "type": "go",
            "request": "launch",
            "cwd": "${workspaceRoot}/install/bin",
            "mode": "exec",
            "env": {"KWDB_ROOT":"${workspaceRoot}/install",
            "LD_LIBRARY_PATH":"/usr/local/lib:${workspaceRoot}/install/lib"},
            "program": "${workspaceRoot}/install/bin/kwbase",
            "args": ["start",
                    "--insecure",
                    "--listen-addr=0.0.0.0:20257",
                    "--http-addr=0.0.0.0:20080",
                    "--store=/home2/dev2/kwbase_data/n31",
                    "--join=0.0.0.0:20257"
                    ],
            "dlvFlags": [
                        "--check-go-version=false"
                    ]
        },
        {
            "name": "(gdb) Launch kwbase V2.0",
            "type": "cppdbg",
            "request": "launch",
            "program": "${workspaceRoot}/install/bin/kwbase",
            "args": ["start",
                    "--insecure",
                    "--listen-addr=0.0.0.0:20257",
                    "--http-addr=0.0.0.0:20080",
                    "--store=/home2/dev2/kwbase_data/n31",
                    "--join=0.0.0.0:20257"
                    ],
            "stopAtEntry": false,
            "cwd": "${workspaceRoot}/install/bin",
            "environment": [{"name":"KWDB_ROOT", "value":"${workspaceRoot}/install"},
                            {"name":"LD_LIBRARY_PATH", "value":"${workspaceRoot}/install/lib"}],
            "externalConsole": false,
            "MIMode": "gdb",
            "setupCommands": [
                //{"text": "set detach-on-fork off"},
                //{"text": "set follow-fork-mode child"},
                {
                    "description": "Enable pretty-printing for gdb",
                    "text": "-enable-pretty-printing",
                    "ignoreFailures": true
                },
                {
                    "description": "Set Disassembly Flavor to Intel",
                    "text": "-gdb-set disassembly-flavor intel",
                    "ignoreFailures": true
                }
            ]
        },
        {
            "name": "(Go) Attach to Process",
            "type": "go",
            "request": "attach",
            "mode": "local",
            "processId": 0
        }
    ]
}
SSH Connection Configuration in Visual Studio Code for Virtual Machine or Container Environment